
 December 13, 2025
  Synergetic
  Uncategorized
 🎤 Why your outfit matters for your mic
As an audio engineer, when we know we have to use a microphone with female presenters—whether for a gala, keynote, or fundraising event—one of the first checks is: How will the lavalier microphone (aka “lav mic”) be attached, and what is the presenter wearing? Men generally have an easier time attaching the microphone to their clothing, but for women, the clothing they wear can, more often than not, make for a challenging microphone attachment.
The truth: audio isn’t just about gear—it’s about integration between gear, presenter, and outfit. A lav mic clipped onto the wrong fabric, in the wrong place, or with the body-pack transmitter flapping awkwardly can cause signal problems, rustling noises, and an unpolished look. Since your voice is one of the most powerful tools in your presentation, you deserve to set it up for success.
In this article, we are going to discuss the best clothing to wear if you intend to use a lavalier microphone. Presenters always have the option to use a handheld microphone or even an over-the-ear microphone, we find them to be less common. So, let’s dive in.
✅ Do this / ❌ Don’t do this
Here are actionable steps you can incorporate—what to do, and what to avoid—so your mic placement and outfit work in harmony.
Do this
- Choose clothing with firm surfaces or well-constructed lapels, collars, or seams. These give the mic clip a stable anchor point.
- Wear a blazer, jacket, or top with a lapel or structured collar. These make ideal mounting spots.

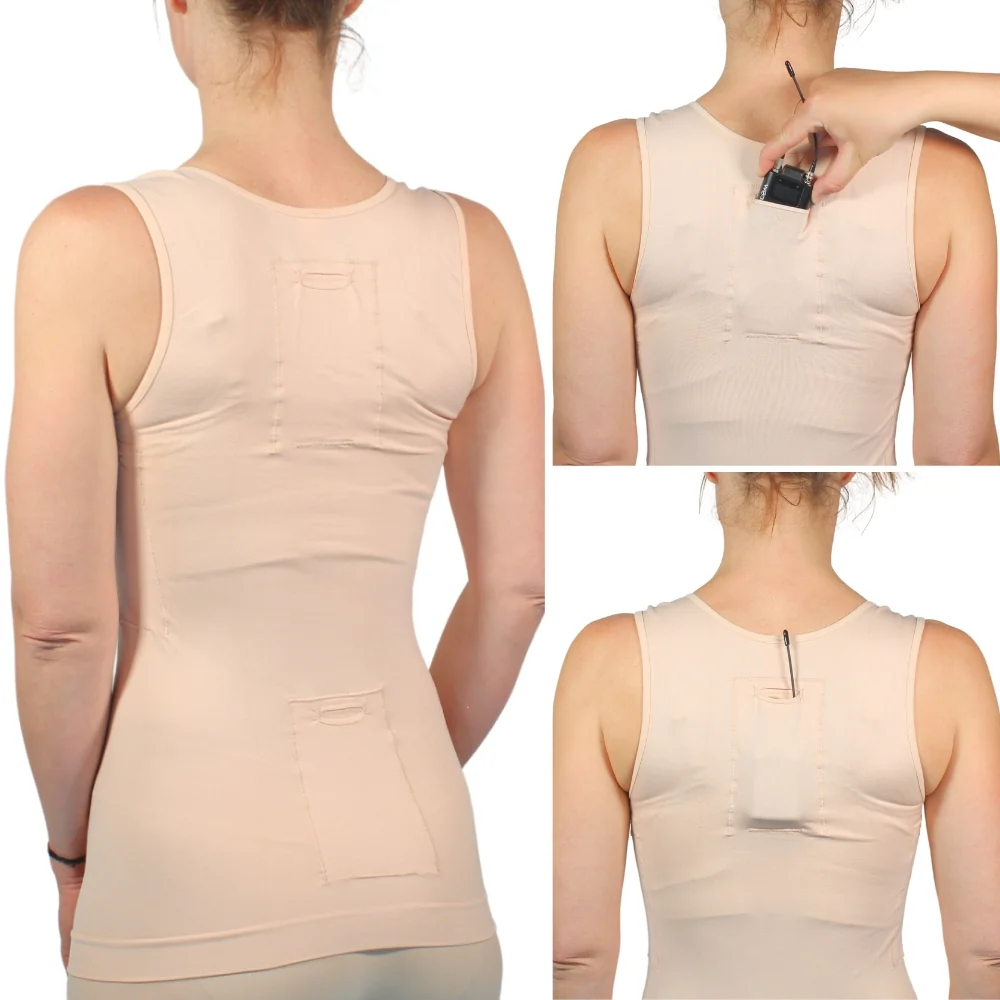
- Use a hidden pocket or built-in pocket, if possible, for your body-pack transmitter (the small wireless box). If you have a jacket with an interior pocket, that’s ideal.
- Plan in advance: try on your outfit with the mic on during rehearsal or sound-check. Move around, speak, gesture—listen for rustles or muffled audio.
- Use the mic clip at mid-chest level, about 6 to 12 inches (15 to 30 cm) down from your chin or collarbone. Not too high, not too low. This captures your voice’s fullness without over-emphasizing “chest boom”.
- Secure the cable or wireless pack so it doesn’t rub against clothing, jewelry, or skin. A few discreet clips or medical-tape patches can stop rustle noise.
Don’t do this
- Don’t wear a flimsy fabric like silk, satin, or very thin knit with heavy texture—these can cause rustling when the lav mic is clipped.
- Don’t pick an outfit with no place to clip the mic—like a one-piece dress with a high neckline and no lapels, and no interior pocket for the pack. You’ll struggle to anchor the mic or hide the pack.

- Don’t put the mic capsule under a thick seam, deep fold, bulky necklace or layered clothing without testing—obstructions degrade sound quality.
- Don’t put the mic capsule around your hair if it is long. Your hair will end up covering it and affecting the audio.

- Don’t forget the body-pack transmitter. If your outfit has no pocket, and the pack is left hanging or clipped awkwardly to a bra strap or outward-facing belt loop, it can become visible, shift during movement, or pick up noise.
- Don’t assume rehearsal covers dress-code-related audio issues—always do a full test with the outfit and microphone together.
🎯 What to wear: best clothing choices
Here are specifics on clothing that support strong audio and a confident visual presence.
✅ Best choices
- Structured blazer or tailored jacket: Ideal because the lapel or collar gives a secure clip-on point. The interior pocket often houses the transmitter pack.
- Button-down blouse or shirt with a placket: The front center area provides good clip stability. The seams help reduce movement noise.
- Dress with a defined neckline and a seam near the chest: Choose a dress that has a collar, front seam, or a zipper closure visible or hidden—this gives you location for mic clip + pack.
- Two-piece outfit (top + skirt or trousers): Allows you more flexibility to hide the pack (in waistband or pocket) and adjust mic placement easily.
❌ Less-ideal choices
- One-piece dress with a high neckline(e.g., turtleneck or funnel neck) and no lapel or pocket: there’s nowhere reliable for mic clip or transmitter.
- Delicate fabrics like silk, satin, chiffon that are thin and might rub or flutter, causing rustle when the mic moves.
- Shiny, sheer, or very textured fabrics (sequins, heavy texture) that can reflect sound oddly or cause visual distraction for camera/lighting.
- No pocket in trouser/skirt and no internal waistband loop for pack—this forces pack to clip externally, which may hang or bounce.
🔧 Mic placement & transmitter pack best practices
Mic placement
- Aim for the front center of the chest, clipped to the edge of a lapel or placket, roughly 6-12 inches below the chin. This gives a clear, consistent signal.
- If wearing a jacket, clip the mic to the lapel edge—not too far inside the collar fold. Ensure the mic capsule is facing outward, not pinned under folds.
- If wearing a blouse or dress, clip the mic to a seam or solid part of fabric, avoiding loose drapes or folds that might shift. A zipper seam, front seam or even jewelry accessories (if stable) can help.
- Always hide or secure the mic cable: route it under clothing toward the bodypack, clip it discreetly and minimize contact with fabric that might rub.
Transmitter pack placement
- Ideally: small interior pocket of jacket or blouse (at waist or side).
- If no pocket: use a discreet waistband clip or belt clip behind the presenter’s back.
- If absolutely no option: clip to a bra strap or inside the waistband—only if you secure it so it doesn’t shift visibly or bounce. But avoid visibility and movement.
- Avoid placing the pack at the presenter’s front—it may be visible, awkward under stage lighting or produce rustle when the presenter moves.
If you really want to be prepared, we have seen some presenters use Ursa Straps. We really like them!
📸 Visuals matter too
When you’re on stage, walking towards a podium or being photographed for a gala, your audio and visuals work together. If the mic or transmitter pack are visible or appear awkward, it distracts from your message. A clean clip, secure cable, and hidden pack contribute to both good sound and great appearance.
✅ Final checklist for women presenters
- Outfit has a clip-friendly surface: lapel/collar/placket or solid seam.
- Fabric is stable (cotton blend, wool blend, structured material) rather than slippery satin or heavily textured.
- The outfit allows for a hidden or discreet pack placement (interior pocket or waistband clip).
- Lav mic is clipped at mid-chest, roughly 6-12″ below chin, solid clip point, capsule facing outward.
- Cable routed under clothing, secured with clips or tape to avoid rustle.
- Transmitter pack is secured and hidden (not dangling, bouncing or visible to the camera).
- Before show: speak and move with mic on + outfit + pack to check for rustle or shift.
- Photos: ask a photographer to check side and back angles to ensure nothing looks off under lighting.
🧠 Why this attention matters
While most audience members may not consciously notice the mic, they do notice if your audio is inconsistent, if you’re touching the mic cable, or if you appear “wired” or distracted. As an AV audio expert, we have seen perfect stage lighting and big-budget rigs undermined solely because the presenter’s outfit or mic placement was off. On the flip side, the presenters who sound clear, walk confidently, and look seamless often prepared their outfit and audio setup ahead of time.
Your voice is one of your most powerful tools — when you pair it with the right outfit and the right mic setup, you’re presenting not just your message, but you at your best.
🎬 In summary
- Think of your lav mic setup like part of your professional wardrobe—not an afterthought.
- Choose an outfit that supports mic clipping and pack placement.
- Place the mic thoughtfully, secure the pack, and test in movement.
- The result: you’ll sound confident, look polished and be ready for both the live moment and the camera.
Of course, using an over the ear microphone can mitigate all of this, and could be a great option for you if you are comfortable with wearing one! Something to keep in mind.

Here’s to looking great, sounding brilliant and owning that stage. 💜
 January 23, 2026
  Synergetic
  About Us